I am having many issues rendering my files in Adobe Premiere Pro, I have taken the decision to just put my renders and the rest of the files onto a disk and hand them in. The program loads to 50% then crashes.
Friday, 4 May 2012
If Only...
I would class this animation as a success, I have managed to complete more than I was expecting to do. Considering I have never used 3DS I am proud of what I have managed to achieve in the space of time we were given to create the models and the animation. However, I do believe that given more time I would have been able to improve on what I have created. Further improvements to my animation include, adding scenery (such as trees and plants), adding soldiers to march behind the tank, creating a more realistic landscape and improving the lighting by adding more omni lights.
Premier Pro
To stitch together the various scenes of my animation, I used Adobe Premier Pro. This was a steep learning curve as I have never used this software before. I firstly imported all 8 scenes into the program. I then moved them in order onto the time line. I rendered the uncompressed files to make sure that they were in the correct order and they were rendered properly. It was at this point I was able to add my sound, the introduction to the animation and the end credits.
The Render Setup
Rendering was a little harder then expected. Not only did the system take a lot of time to render it also tended to go wrong several times. The settings required to render the project were very tight, thus requiring me to re-render 3 scenes that were required to be uncompressed (where as I had them set up to compress). The settings for the render were as follows:
- The render was to be in HDTV 720x1280
- The file was to be uncompressed
- The file needed to be saved as an .avi
 |
| Render Setup |
Lights, Camera, Action
For my animation I have used 7 different cameras to get various different angles of my animation. This means there will be 8 different scenes (as I have split the last render into 2). The cameras I have used have been target cameras as I have found they are easier to use and are good for filming the action I wanted in my animation. To focus the camera and zoom in and out of my various different objects I have used the set key, as I found out earlier on in my animation, less can go wrong with the set key.
I have also decided to use the daylight system lighting, which I have set to Rome (to give my animation that authentic Italian feel). I have also included one omni light in front of the target as this was an area that rendered very dark, due to the target facing away from the daylight system.
 |
| Camera Setup |
I have also decided to use the daylight system lighting, which I have set to Rome (to give my animation that authentic Italian feel). I have also included one omni light in front of the target as this was an area that rendered very dark, due to the target facing away from the daylight system.
 |
| Daylight system settings |
Rendering Issues
I am currently having a few teething problems with the final scene of my animation. It seems that the render will not go past 9 seconds. I am going to try and split the render up into smaller chuncks of frames. Hopefully this will fix the problem.
Update 04/04/2012 11:50
Unfortunately the problem can't be rectified and as such the animation will be missing a second. It seems that the render will not get any bigger then 0.99GB
Update 04/04/2012 11:50
Unfortunately the problem can't be rectified and as such the animation will be missing a second. It seems that the render will not get any bigger then 0.99GB
Thursday, 3 May 2012
Smoke Signals
Following on from the tutorial I posted on my attempt at spray particles and smoke, I have now learnt the art of adding material to the smoke. To start off with I opened up the material editor, I then went down to maps, click on diffuse colour and then none. Once I got to the drop down menu I clickd on particle age.
I changed th colour options within this and went back to the parent. I also removed the glossiness on the material becuase as well all know smoke it not shiny!!
I then changed the opacity, another option found in the maps tab. I again clicked on none and chose mask from the menu. For the map choice I used noise. And for the second choice (mask), I clicked on gradient, and left the settings as they were.
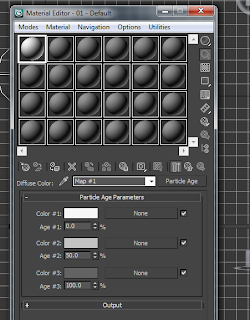 |
| Options for the particle ages |
I then changed the opacity, another option found in the maps tab. I again clicked on none and chose mask from the menu. For the map choice I used noise. And for the second choice (mask), I clicked on gradient, and left the settings as they were.
I am hoping to import this smoke with materials into my animation.
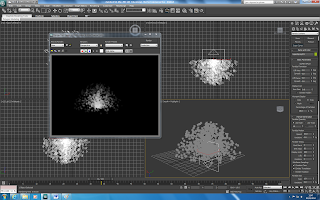 |
| Finished smoke with materials |
A Trail of Smoke
As I progress with my animation, I am thinking more about what kind of extras I can add that will give it a more realistic feeling. I have been thinking about adding smoke but I wouldn't know where to start. Thanks to the useful tutorial on YouTube (http://www.youtube.com/watch?v=Azn8i81pAm0). I am now just about able to do it, with a few minor issues here and there. The particle system I have used to create the test smoke below is the Super Spray, which has been set to the fireworks setting. I started off by dragging the particle system onto the stage. I then chose the preset firework and clicked load.
I plan to adjust the various settings until I get a smoke like system that will look it has come from the cannon. I am going to edit the start and end time, as well as the density, size and shapes of the particles.
I plan to adjust the various settings until I get a smoke like system that will look it has come from the cannon. I am going to edit the start and end time, as well as the density, size and shapes of the particles.
Morphing The Face
Todays tutorial featured the morpher tool. This was something that I found very interesting and something that I found out will come very handy when working with characters (next year in 3D character modelling). We were provided with a basic face to which we created three instances. To these three faces, different emotions (jaw drop, blinking and eye brow raising).
Polygon selecter tool was used to raise the eyebrows of the far right face, and make the face in the middle blink. The grow tool was used to extend the mouth of the face on the left. Once this was all done, I clicked on the original face and went to the modify tab. I then went to the drop down menu and clicked on morph. When the channels menu poped up, I right clicked and chose add morph from scene and chose a model. I repeated this processes for the rest of the models. This gave the orginal face the traits of all the edited replicas. To finish off the process the orginal face was turbo smoothed and the three morphers hidden from view.
Adding a Skyline
Adding the sky to my animation was a very simple process. Simply pressing 8 on the keyboard will open up the environment and effect menu. In the background menu under environment map I clicked on none, chose bitmap and picked the image of the sky. Couldn't be simpler and it adds the skyline to the whole animation, not just one area.
Animation Update
As my animation continues to grow, I have been thinking about the sound that I would like to include with it. I have narrowed the list down to 7 possible songs, these are:
- London - James Newton Howard (http://www.youtube.com/watch?v=FCkVmlSVmns)
- Diamond Mine Bombed - James Newton Howard (http://www.youtube.com/watch?v=IUlft_0XW_E)
- The Shard - Steve Jablonsky (http://www.youtube.com/watch?v=Vwz5vNu65Qk)
- Magneto - Henry Jackman (http://www.youtube.com/watch?v=ohuq3ks35RA)
- Like a Dog Chasing Cars - Hans Zimmer (http://www.youtube.com/watch?v=a8-XarUUxM0)
- And I Thought My Jokes Were Bad - Hans Zimmer (http://www.youtube.com/watch?v=wbcVAtmQbMk)
- Kashmir - Escala ft. Slash (http://www.youtube.com/watch?v=t5_2t3FDu2s)
It's Alive!
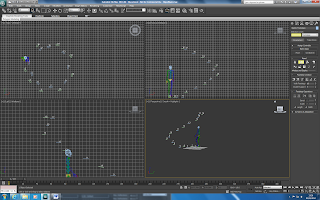
I never realised how easy it was to make a biped, let alone make one walk! Today's lab session involved these so called bipeds (skeletons that are stuck onto created figures to help them get a more realistic movement). First things first, the biped needed to be created, to do this I went into the create tab and clicked on the systems menu. I then added the biped to the scene. At this point, fingers, toes and various other bones can be added (even tails).
Now to make it walk, something very simple as 3DS does it for you, all that's needed is to place the steps. There a different ways to add steps and make your biped walk. There are also various different actions that the biped can perform. The three basic actions are walking, running and jumping. The quickest was to make the biped walk is to click the create multiple footsteps tool. This will create a line of steps that can be moved left or right, as well as having the option of adding or taking away steps. Another more painstakingly slow option is to add the steps one at a time, this however does let the user move the steps to a position that they want. Something that can be useful when making the biped walk up stairs.
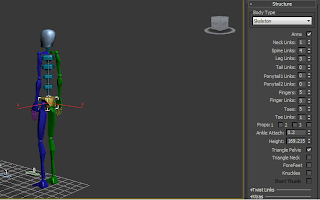 |
| Setting up the Biped |
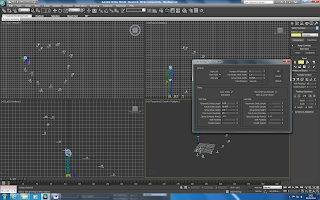 |
| Multiple Footsteps |
 |
| Walking Upstairs |
Storyboard
This is the basic storyboard for my animation. It features the basic camera angles as well as a description of the scene, I am hoping to follow this storyboard in my animation. I may have to make a few tweaks to the storyline and narrative.
Wednesday, 2 May 2012
STRIKE!!!!!!
After learning to use the reactor software, my basic knowledge was put to the test when we used the software to create a bowling ball heading for the pins down a small alley. Again like with the boxes, all the objects within the view port needed to be changed to Rigid Body Collection. The mass of the objects were changed too, the alley was set to 0, the pins were set to 10 and the ball was set to 20. Once the mass was changed the collision tolerance for the pins needed to be adjusted as when the animation was played the pins would jump up and leave a gap. Trial and error set the tolerance to 0.4 and although the pins still jump up it is minimal.
So the pins are set and the alley was ready but the ball itself needed to move towards the pins. To achieve this, the ball needed to move forward in frames 1 - 5. The autokey was used to help me achieve the movement. As well as this, I added a small rotation to the ball to give it a more realistic movement. After the ball has been moved the start time for the animation need to be changed for 0 to 1 as this will allow the software to recognise the movement of the ball in frame one (the timing menu can be found under preview and animation) this is crutial as without changing the start frame, the ball will just fall!
So the pins are set and the alley was ready but the ball itself needed to move towards the pins. To achieve this, the ball needed to move forward in frames 1 - 5. The autokey was used to help me achieve the movement. As well as this, I added a small rotation to the ball to give it a more realistic movement. After the ball has been moved the start time for the animation need to be changed for 0 to 1 as this will allow the software to recognise the movement of the ball in frame one (the timing menu can be found under preview and animation) this is crutial as without changing the start frame, the ball will just fall!
Reactor Training
Today's lesson saw us being turned into physicists for the afternoon. Playing with the Reactor software within 3Ds, which allowed us to change that mass, friction, elasticity, gravity.. etc. of an object. This proved very entertaining and will prove to be useful when creating the animation for the final project. Basic training started with creating two boxes (one considerably larger than the other). The smaller box would be dropped onto the larger, by adjusting various settings within the Reactor software. To make the box more interesting when it fell, the angles and height was changed. After angling the box to and adjusting the height, I changed the boxes into Rigid Body Collection (this can be found in the animation tab, clicking on the reactor section and finally it can be found in the create object menu). Once both boxes were converted, I changed the mass of the smalled box to 20 (this would make it fall rather then remain static). Upon preview of this animation I watched as one box successfully crashed into the other!
Subscribe to:
Comments (Atom)


