I am having many issues rendering my files in Adobe Premiere Pro, I have taken the decision to just put my renders and the rest of the files onto a disk and hand them in. The program loads to 50% then crashes.
3D Modelling and Animation
Friday, 4 May 2012
If Only...
I would class this animation as a success, I have managed to complete more than I was expecting to do. Considering I have never used 3DS I am proud of what I have managed to achieve in the space of time we were given to create the models and the animation. However, I do believe that given more time I would have been able to improve on what I have created. Further improvements to my animation include, adding scenery (such as trees and plants), adding soldiers to march behind the tank, creating a more realistic landscape and improving the lighting by adding more omni lights.
Premier Pro
To stitch together the various scenes of my animation, I used Adobe Premier Pro. This was a steep learning curve as I have never used this software before. I firstly imported all 8 scenes into the program. I then moved them in order onto the time line. I rendered the uncompressed files to make sure that they were in the correct order and they were rendered properly. It was at this point I was able to add my sound, the introduction to the animation and the end credits.
The Render Setup
Rendering was a little harder then expected. Not only did the system take a lot of time to render it also tended to go wrong several times. The settings required to render the project were very tight, thus requiring me to re-render 3 scenes that were required to be uncompressed (where as I had them set up to compress). The settings for the render were as follows:
- The render was to be in HDTV 720x1280
- The file was to be uncompressed
- The file needed to be saved as an .avi
 |
| Render Setup |
Lights, Camera, Action
For my animation I have used 7 different cameras to get various different angles of my animation. This means there will be 8 different scenes (as I have split the last render into 2). The cameras I have used have been target cameras as I have found they are easier to use and are good for filming the action I wanted in my animation. To focus the camera and zoom in and out of my various different objects I have used the set key, as I found out earlier on in my animation, less can go wrong with the set key.
I have also decided to use the daylight system lighting, which I have set to Rome (to give my animation that authentic Italian feel). I have also included one omni light in front of the target as this was an area that rendered very dark, due to the target facing away from the daylight system.
 |
| Camera Setup |
I have also decided to use the daylight system lighting, which I have set to Rome (to give my animation that authentic Italian feel). I have also included one omni light in front of the target as this was an area that rendered very dark, due to the target facing away from the daylight system.
 |
| Daylight system settings |
Rendering Issues
I am currently having a few teething problems with the final scene of my animation. It seems that the render will not go past 9 seconds. I am going to try and split the render up into smaller chuncks of frames. Hopefully this will fix the problem.
Update 04/04/2012 11:50
Unfortunately the problem can't be rectified and as such the animation will be missing a second. It seems that the render will not get any bigger then 0.99GB
Update 04/04/2012 11:50
Unfortunately the problem can't be rectified and as such the animation will be missing a second. It seems that the render will not get any bigger then 0.99GB
Thursday, 3 May 2012
Smoke Signals
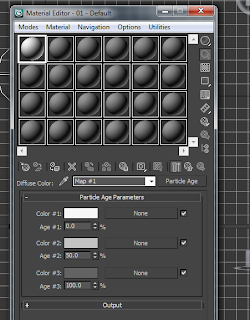
Following on from the tutorial I posted on my attempt at spray particles and smoke, I have now learnt the art of adding material to the smoke. To start off with I opened up the material editor, I then went down to maps, click on diffuse colour and then none. Once I got to the drop down menu I clickd on particle age.
I changed th colour options within this and went back to the parent. I also removed the glossiness on the material becuase as well all know smoke it not shiny!!
I then changed the opacity, another option found in the maps tab. I again clicked on none and chose mask from the menu. For the map choice I used noise. And for the second choice (mask), I clicked on gradient, and left the settings as they were.
 |
| Options for the particle ages |
I then changed the opacity, another option found in the maps tab. I again clicked on none and chose mask from the menu. For the map choice I used noise. And for the second choice (mask), I clicked on gradient, and left the settings as they were.
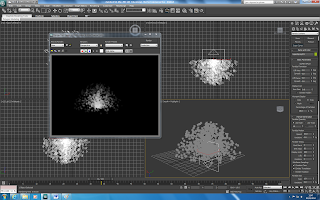
I am hoping to import this smoke with materials into my animation.
 |
| Finished smoke with materials |
Subscribe to:
Comments (Atom)

